

The fastest way to harden a Microsoft 365 tenant is to fix identity first, then email, endpoints, data, and monitoring, in that order. Every credible framework, including Microsoft's own Zero Trust guidance, points to the same conclusion: verify explicitly, apply least privilege, and assume a breach is already underway somewhere in your environment. That ordering isn't arbitrary. Identity compromise is the entry point for most Microsoft 365 attacks, which means the controls that protect sign-ins deliver more security per hour of work than almost anything else on this list.
Here's the prioritized sequence, with the license tier and rough deployment time attached to each item:
- Enable MFA for every user and block legacy authentication (Entra ID, free tier or higher; 1 to 2 days)
- Protect admin accounts with role-based access and Privileged Identity Management (Entra ID P2; 2 to 3 days)
- Roll out Conditional Access policies in report-only mode, then enforce (Entra ID P1/P2; 1 to 2 weeks)
- Turn on Microsoft Secure Score monitoring and set a review cadence (included in most tenants; ongoing)
- Configure Defender for Office 365 preset policies (Defender for Office 365 P1/P2; 3 to 5 days)
- Onboard devices to Intune and Defender for Endpoint (Business Premium or Defender for Business; 2 to 4 weeks)
- Deploy Purview DLP and sensitivity labels in audit mode (Purview add on or Business Premium; 2 to 3 weeks)
- Build an incident response playbook and test backups (varies; 1 to 2 weeks)
| Priority | Protects | Who Needs It | License Level |
|---|---|---|---|
| 1. MFA + block legacy auth | Identities | All users | Entra ID (free) |
| 2. Admin protection + PIM | Privileged accounts | Global/role admins | Entra ID P2 |
| 3. Conditional Access | Identities, devices | All users | Entra ID P1/P2 |
| 4. Secure Score monitoring | Whole tenant | IT admins | Included |
| 5. Defender for Office 365 | Email, Teams, files | All users | Defender for O365 P1/P2 |
| 6. Intune + Defender for Endpoint | Devices | All users | Business Premium |
| 7. Purview DLP + labels | Sensitive data | Data owners, compliance | Purview / Business Premium |
| 8. Backup + IR playbook | All workloads | IT admins | Third-party backup tool |
That's the full arc of a working microsoft 365 security checklist. The rest of this guide walks through each layer with exact console paths, so you can move from "we should probably do this" to "this is done and being monitored."
Key Takeaways
A Microsoft 365 security checklist works only when identity controls are implemented first, followed by email, endpoints, data protection, and continuous monitoring, in that specific order.
| Point | Details |
|---|---|
| Identity comes first | Enable MFA for all users and block legacy authentication before touching any other control. |
| Least privilege on admin roles | Cut Global Admin accounts to two or three people and use Privileged Identity Management for the rest. |
| Test before you enforce | Run Conditional Access and DLP policies in audit or report-only mode for one to two weeks before blocking anything. |
| Backups are separate from retention | Native Microsoft 365 retention doesn't replace independent backups; test restores at least annually. |
| Symmnet as the implementation path | Symmnet offers managed onboarding of Intune, Defender, and Purview controls with fixed pricing and 24/7 monitoring for small businesses that lack internal security staff. |
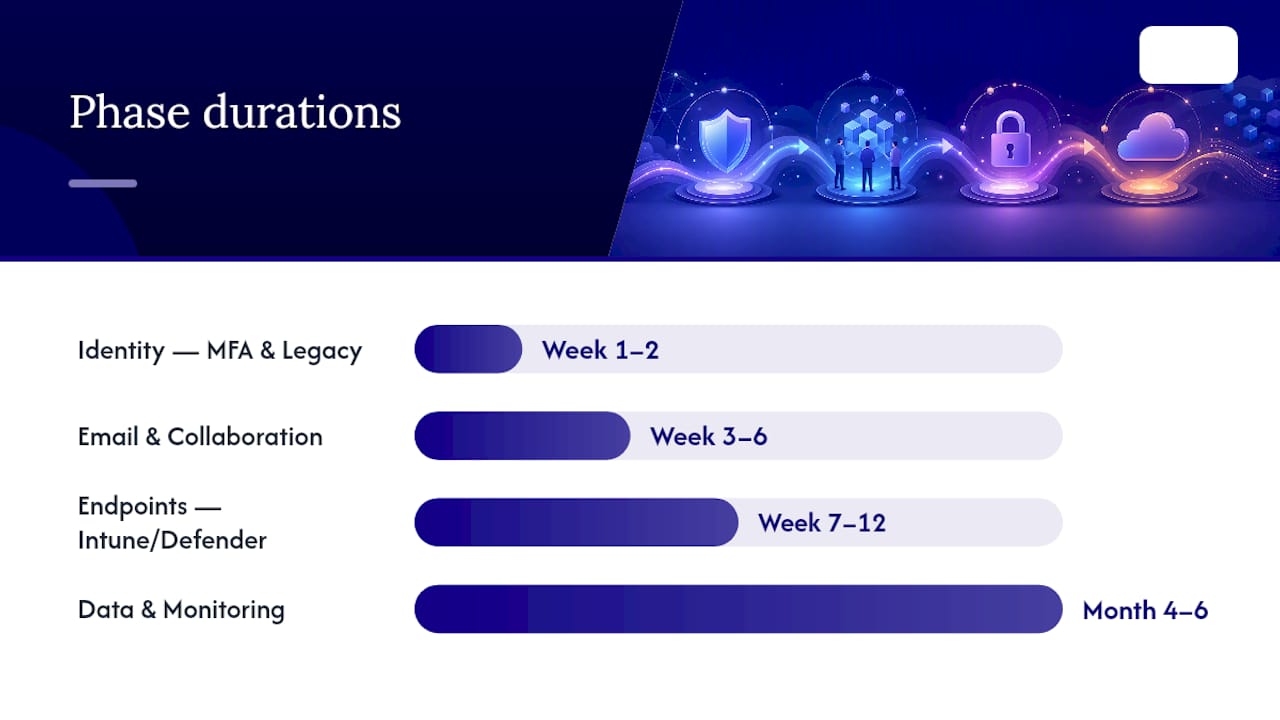
Enable MFA for all users, block legacy authentication, reduce Global Admin count, turn on Secure Score monitoring, and apply the Defender for Office 365 Standard preset during an initial phase.
Progress Conditional Access from report-only to enforced mode, onboard devices to Intune and Defender for Endpoint, and apply the Strict preset to executives and IT staff during the subsequent phase.
Deploy Purview sensitivity labels and DLP starting in audit mode, transition high-confidence policies to enforcement, finalize your incident response playbook, and complete a full backup restore test in the longer-term phase.
- Week 1 to 2: identity hardening and admin protection.
- Week 3 to 6: email and collaboration protections plus Conditional Access rollout.
- Week 7 to 12: endpoint onboarding and device compliance.
- Month 4 to 6: data protection, monitoring maturity, and incident response testing.
Table of Contents
- Why Identity Controls Come First: MFA, Admin Protection, and Entra ID Hardening
- How Do You Secure Email and Collaboration With Defender for Office 365?
- What Does Endpoint Protection Look Like With Intune and Defender for Endpoint?
- Building Data Protection With Microsoft Purview
- What Security Baselines Reduce Risk Fastest?
- How Should You Monitor and Respond to Microsoft 365 Threats?
- Does Phishing Training Actually Reduce Risk?
- Why Backups Matter Even With Microsoft 365 Retention Policies
- What Ongoing Maintenance Keeps a Hardened Tenant Secure?
- Mapping Controls to Microsoft 365 Licensing Tiers
- Should You Handle This In-House or Bring in a Managed Provider?
- Why Identity Deserves the First Dollar and the First Hour
- Getting This Checklist Fully Implemented Without Hiring an Internal Security Team
- Sources
Why Identity Controls Come First: MFA, Admin Protection, and Entra ID Hardening
Identity is the highest-impact layer of any Microsoft 365 security baseline, and it's the layer attackers hit hardest. Microsoft's SMB security guidance puts MFA and admin account protection at the top of its list for a reason: most tenant compromises start with a stolen password, and legacy authentication protocols like POP, IMAP, and older versions of ActiveSync can't enforce modern MFA at all. Attackers know this, so they specifically target accounts still using those protocols.
Here's the sequence to work through, in order:
- Enable MFA for all users. Go to Entra ID > Authentication methods and require at least one modern method (Authenticator app, FIDO2 key) for every account, including service accounts wherever possible.
- Block legacy authentication. Create a Conditional Access policy that blocks legacy auth protocols outright, since these protocols cannot support Conditional Access or MFA prompts at the transport level.
- Create one or two "break glass" emergency accounts. These are excluded from Conditional Access and MFA, stored with a strong password in a sealed physical location, and used only if you lock yourself out of the tenant.
- Reduce your Global Admin count to two or three people, maximum. Everyone else gets a scoped role, such as Helpdesk Administrator or Exchange Administrator, matched to their actual job.
- Onboard Privileged Identity Management (PIM) for any remaining admin roles, so elevated access is just in time and requires approval rather than standing permanently active.
Least privilege isn't a compliance checkbox. A Global Admin account that's always elevated is a standing target, and every unnecessary admin role is one more account an attacker only has to phish once.
Pro Tip: Run new Conditional Access policies in report-only mode for one to two weeks before enforcing them. This shows you exactly which sign-ins would have been blocked, so you catch legitimate business exceptions (a vendor's legacy scanner, an old line-of-business app) before you lock out a real user by accident.
How Do You Secure Email and Collaboration With Defender for Office 365?

Enable Defender for Office 365 preset security policies and apply Safe Links and Safe Attachments across every collaboration surface, not just Outlook. Email remains the number one delivery method for phishing and malware, but a growing share of that traffic never touches a mailbox; it lands directly in a Teams chat or a shared SharePoint file.
The baseline configuration:
- Assign the Standard preset policy to all users as a default floor.
- Apply the Strict preset policy to executives, finance staff, and IT admins, since these accounts are disproportionately targeted by business email compromise attempts.
- Turn on Safe Links for email, Teams, and Office apps, so URLs are checked and rewritten at the time of click, not just at delivery.
- Turn on Safe Attachments for Exchange, SharePoint, OneDrive, and Teams, so files are detonated in a sandbox before a user can open them.
- Set outbound spam limits to catch a compromised account before it starts mass mailing.
- Enable mailbox intelligence so the anti-phishing engine learns each user's normal contacts and flags impersonation attempts.
Console targets: these all live in the Microsoft Defender portal under Email & Collaboration > Policies & Rules > Threat Policies.
A word on false positives. Strict presets occasionally quarantine legitimate vendor invoices or newsletters, especially in the first few weeks. Build a habit of checking the quarantine folder daily during rollout, and release false positives rather than disabling the policy that caught them. That short-term friction is far cheaper than one successful phishing click.
What Does Endpoint Protection Look Like With Intune and Defender for Endpoint?
Onboard every company-owned and BYOD device that touches Microsoft 365 data into Intune and Defender for Endpoint, because a compliant tenant with unmanaged laptops is still an open door. Identity controls stop unauthorized sign-ins, but they don't stop a compromised device with an already-valid session token from acting as an attacker's proxy.
Deployment checklist, in a practical build order:
- Confirm enrollment prerequisites. Devices need to be Entra ID joined or hybrid joined, and users need appropriate licensing (Intune P1 comes bundled with Business Premium).
- Enforce disk encryption. BitLocker for Windows, FileVault for macOS, both required as a compliance policy, not a suggestion.
- Push baseline configuration profiles covering password complexity, screen lock timers, and firewall status.
- Turn on attack-surface reduction rules in Defender for Endpoint, starting with rules that block Office apps from creating child processes and block credential stealing from the LSASS subsystem.
- Add web content filtering to block known malicious and inappropriate categories at the network level.
- Tie device compliance to Conditional Access, so a device that fails encryption or patching checks gets blocked from accessing mail and files until it's fixed.
For staging, start with a pilot group of five to ten users, ideally a mix of IT staff and one or two tolerant end users. Give that group three to five business days to surface issues, then expand in phases. A small organization of 20 to 50 employees can typically finish a full rollout in two to four weeks, assuming devices are already domain joined or Entra ID joined.
- Pilot group: 3 to 5 business days
- Departmental rollout: 1 to 2 weeks
- Full tenant compliance enforcement: 2 to 4 weeks total
Building Data Protection With Microsoft Purview
Start Purview DLP policies and sensitivity labels in audit mode, not enforcement mode. This is the single most common mistake IT admins make when rolling out data protection: they turn on a "block" policy on day one, break a legitimate business workflow, and then disable DLP entirely out of frustration. Microsoft's own DLP documentation is built around this audit-first approach for good reason.
The build sequence:
- Create sensitivity labels for at least three tiers: Public, Internal, and Confidential. Add a fourth (Highly Confidential) if you handle regulated data like PHI, ITAR-controlled files, or financial records.
- Set up auto-labeling rules so files containing patterns like Social Security numbers or credit card numbers get tagged automatically, rather than relying on users to label consistently.
- Deploy DLP policies across Exchange, SharePoint, OneDrive, and Teams in audit mode, and let them run for two to four weeks without blocking anything.
- Review the audit reports to see what's actually being flagged and by whom, so you can tune out false positives, such as a legitimate customer list being emailed to a known partner.
- Switch high-confidence policies to block or restrict mode, keeping lower-confidence rules in audit mode a bit longer.
- Configure retention policies and eDiscovery holds for any data category subject to regulatory retention requirements, litigation holds, or industry audits.
Licensing note: sensitivity labels and basic DLP require a Purview add on or come bundled with Microsoft 365 E5 or Business Premium in scoped form. Full eDiscovery and advanced auto-labeling generally require higher tiers, so confirm what's included before promising a client or your leadership a capability the tenant doesn't actually support yet.
Pro Tip: Watch your Secure Score and the DLP incident reports side by side during the audit phase. If a policy generates dozens of false positives a day, it needs tuning, not enforcement. Rushing to "block" mode is how good data protection programs get shut off entirely after one angry phone call from a department head.
What Security Baselines Reduce Risk Fastest?
Apply Microsoft's preset security baselines before you write a single custom policy. Baselines exist because most tenant compromises exploit common misconfigurations, not novel attacks, and Microsoft has already done the work of encoding sane defaults for Windows devices, Intune-managed endpoints, and Defender policies.
The baseline types worth applying immediately:
- Windows security baselines in Intune, covering password policy, BitLocker, and firewall rules in one bundle.
- Microsoft Defender for Endpoint baselines, which set sensible defaults for real-time protection and cloud-delivered scanning.
- Defender for Office 365 preset policies (Standard and Strict), covered earlier in this checklist.
- Attack-surface reduction (ASR) rules, a set of roughly a dozen granular rules that block specific behaviors commonly used by malware, like Office macros launching executable content.
Roll out ASR rules in audit mode first, exactly like DLP. Watch the reporting for a week or two, then flip the highest-confidence rules to block mode one at a time rather than all at once. This incremental approach prevents a single overly broad rule from breaking a legitimate line-of-business tool the week before a big client deadline.
Pro Tip: Tie every baseline change to a Secure Score check before and after. If your score doesn't move or a metric drops, something didn't apply the way you expected, and you'll want to catch that during your change window rather than a week later during an audit.
How Should You Monitor and Respond to Microsoft 365 Threats?
Enable continuous monitoring through Secure Score, Defender alerts, and unified audit logging, then write down what happens when one of those alerts fires. A checklist without a monitoring layer behind it degrades within months, because Microsoft ships new features and threat actors adjust their techniques faster than any static configuration can keep up.
The monitoring build:
- Set alert policies in the Defender portal for high-risk activity: impossible travel sign-ins, mass file downloads, mailbox forwarding rule changes.
- Enable unified audit logging in Purview so every admin action and user event is searchable later.
- Set a Secure Score review cadence. Weekly for the first quarter, then monthly once the tenant stabilizes. Secure Score is a prioritization tool, not a scoreboard to chase for its own sake, so focus on the highest-impact recommendations first.
- Centralize log retention for at least 90 days, longer if your industry has specific audit or litigation requirements.
Build a short incident playbook so nobody is improvising during a live compromise:
- Detection: alert fires in Defender or a user reports something suspicious.
- Scope: identify which accounts, devices, and files are affected using audit logs.
- Contain: disable the compromised account, revoke active sessions, isolate the device in Defender for Endpoint.
- Remediate: reset credentials, remove malicious mailbox rules, patch the exploited vector.
- Communicate: notify affected users, leadership, and any regulatory bodies your industry requires.
- Post-incident review: document what happened and update policies to close the gap.
Decide who gets notified for which severity level before an incident happens. A minor phishing click and a confirmed data exfiltration event need very different escalation paths, and sorting that out in the moment wastes precious response time.
Does Phishing Training Actually Reduce Risk?
Ongoing phishing simulation and targeted training reduce successful credential theft more consistently than adding another technical control on top of an already-solid identity baseline. Technology stops a lot of attacks, but the ones that get through are usually the ones a well-trained user would have caught by pausing for five seconds before clicking.
A practical action plan:
- Run simulated phishing campaigns monthly, rotating templates so users don't just memorize "the one from March."
- Train high-risk users individually. Finance, HR, and executive assistants who handle wire transfers or sensitive requests need more frequent, more targeted training than the general staff.
- Turn on the Report Message add-in in Outlook so reporting a suspicious email takes one click instead of a screenshot and an email to IT.
- Track click rate and report rate as your two core metrics, not just how many people "passed" the last test.
- Click rate should trend down quarter over quarter; a stable or rising rate means the training content needs to change.
- Report rate should trend up; more users flagging suspicious mail means the habit is sticking.
- Remediation time (how fast a clicked link gets contained) should shrink as your incident playbook matures.
If a user clicks repeatedly, don't just re-assign training. Pair it with a targeted Conditional Access step-up requirement or a temporary account review, since repeated clicks are often a signal the account itself needs closer monitoring.
Why Backups Matter Even With Microsoft 365 Retention Policies
Microsoft's native retention policies protect against accidental deletion, not against ransomware, insider sabotage, or a misconfigured PowerShell script wiping a SharePoint library. Retention is a compliance feature; a backup is a recovery feature, and confusing the two is one of the more expensive mistakes an IT team can make.
The backup checklist:
- Choose a third-party backup solution that covers Exchange Online, SharePoint, OneDrive, and Teams data independently of Microsoft's retention settings.
- Define your Recovery Point Objective (how much data loss is acceptable, often 24 hours) and Recovery Time Objective (how fast you need to be back up, often measured in hours, not days).
- Schedule restore tests on a real, non-production copy of the data, not just a "backup completed successfully" notification.
- Make sure retention policies and legal holds complement your backup strategy rather than standing in for it. They solve different problems and both are usually necessary for a regulated small business.
Pro Tip: Test a full restore at least once a year, and again immediately after any major tenant configuration change, like a domain migration or a big permissions overhaul. A backup you've never restored from is a hope, not a plan.
What Ongoing Maintenance Keeps a Hardened Tenant Secure?
Continuous governance is what preserves the security gains from everything above. A tenant hardened once in January and never revisited drifts back toward risk within months, as new employees get admin rights nobody remembers to remove and new features ship with default settings that need review.
A minimal governance calendar:
- Monthly: review Secure Score trends and address the top three unaddressed recommendations.
- Monthly: confirm endpoint patching and Defender for Endpoint health across all managed devices.
- Quarterly: audit role assignments and remove access for anyone who's changed jobs or left the company.
- Quarterly: review Conditional Access policies for exceptions that may no longer be needed.
- Annually: run a tabletop incident response exercise, walking through the playbook with your actual team.
- Assign one person or one managed provider as the owner of this calendar.
- Put review dates on a shared calendar with automatic recurring reminders, not a sticky note.
- Document every change made during a review, so the next audit (internal or client-facing) has a paper trail.
Documentation matters more than most IT teams admit. A compliance auditor, cyber insurance underwriter, or new hire taking over the role all need to see what was done and why, not just that "security stuff got handled" sometime last quarter.
Mapping Controls to Microsoft 365 Licensing Tiers
Many of the highest-impact controls in this checklist are already included in Microsoft 365 Business Premium, which bundles Defender for Business, Intune, and a meaningful slice of Purview capability into a single SMB-friendly tier. Understanding exactly what's included, and what still needs an add on, prevents both overspending and gaps you discover the hard way.
| Control Category | What It Protects | Recommended Scope | License Required | Difficulty | Monitoring Needs |
|---|---|---|---|---|---|
| MFA + block legacy auth | Identities | All users | Entra ID (free) | Low | Sign-in logs |
| Conditional Access | Identities, devices | All users | Entra ID P1/P2 | Medium | Policy report views |
| PIM for admin roles | Privileged accounts | Admins only | Entra ID P2 | Medium | Access reviews |
| Defender for Office 365 | Email, Teams, files | All users | Defender for O365 P1/P2 | Low | Quarantine review |
| Intune device management | Endpoints | All users | Business Premium | Medium | Compliance reports |
| Defender for Endpoint | Endpoints | All users | Defender for Business/Business Premium | Medium | Alert dashboard |
| Purview DLP + labels | Sensitive data | Data owners | Purview add on/Business Premium | High | Incident reports |
| Third-party backup | Mail, files, Teams data | All tenant data | Third-party subscription | Low | Restore test logs |
A phased rollout keeps this manageable for a small IT team instead of trying to deploy everything in one exhausting sprint:
- Days 1 to 30: MFA for all users, block legacy auth, protect admin accounts, enable Secure Score monitoring, apply Defender for Office 365 Standard preset.
- Days 31 to 90: roll out Conditional Access from report-only to enforced, onboard devices to Intune and Defender for Endpoint, apply Strict preset to high-risk accounts.
- Days 91 to 180: deploy Purview sensitivity labels and DLP in audit mode, transition to enforcement, formalize the incident response playbook, and complete a backup restore test.
Should You Handle This In-House or Bring in a Managed Provider?
Small teams with dedicated IT staff can absolutely implement the identity layer, MFA, Conditional Access, and admin protection, on their own. That part of the checklist doesn't require specialized tooling, just focused time and Microsoft's own documentation. Where it gets harder is 24/7 monitoring, full endpoint deployment across a mixed device fleet, and producing the kind of compliance evidence an auditor or insurance underwriter will actually accept.
Ask yourself these questions before deciding:
- Does anyone on staff have bandwidth to review Secure Score and audit logs every week, indefinitely?
- Do you operate in a regulated industry (aerospace, manufacturing with ITAR/CMMC exposure, FDA-regulated production) where compliance documentation isn't optional?
- Can your current team realistically staff after-hours incident response, or does a compromise at 11 PM on a Saturday sit unnoticed until Monday morning?
- Is the cost of the licensing tiers you need lower than the cost of an outsourced provider handling deployment and monitoring for you?
If you're evaluating a managed IT provider or MSP for this work, ask pointed questions before signing anything:
- What are your monitoring hours, and is it truly 24/7 or business hours with an on-call rotation?
- What's your documented incident response process, step by step, not a marketing summary?
- Can you produce audit-ready compliance evidence for regulations relevant to my industry?
- How much hands-on experience does your team have specifically with Microsoft 365 tenant hardening, not just general network security?
Delegating monitoring and incident response to a managed provider often produces faster detection and remediation than a small internal team can achieve alone, particularly once you factor in the cost of licensing, tooling, and after-hours staffing needed to do it properly in-house. Symmnet's own work with manufacturing, aerospace, and professional services clients centers on exactly this gap: building the Zero Trust foundation internal teams often don't have the bandwidth to maintain alone.
Why Identity Deserves the First Dollar and the First Hour
Every section of this checklist matters, but if you can only do one thing this quarter, it's still identity. Block legacy authentication, enforce MFA everywhere, and get admin accounts under Privileged Identity Management. Email protections, endpoint management, and data loss prevention all assume the account making the request is legitimate in the first place. Skip identity hardening and every layer built on top of it is protecting a door that was never locked correctly.
One recommendation that runs against common practice: don't treat Security Defaults as a long-term solution just because it's free and easy to turn on. It's a reasonable starting point for a brand-new tenant, but production environments with real business exceptions, contractors needing scoped access, service accounts, legacy line-of-business tools, need the granularity that only Conditional Access provides. Migrating off Security Defaults and into a properly tested Conditional Access policy set is worth the extra week of report-only testing.
Measure everything through Secure Score, but don't let the number itself become the goal. A tenant with a slightly lower score but tightly scoped admin roles and a tested backup plan is in better shape than one chasing points on low-impact recommendations. Keep leadership informed with plain language, not screenshots of dashboards. "We blocked the attack path used in most account takeovers this month" lands better in a board meeting than a Secure Score percentage ever will.
Getting This Checklist Fully Implemented Without Hiring an Internal Security Team
Working through this entire checklist alone, MFA rollout, Conditional Access testing, Intune enrollment, Purview tuning, backup validation, takes most small IT teams several months of nights and weekends layered on top of their regular workload. Symmnet builds and maintains exactly this stack for small businesses in manufacturing, aerospace, and professional services, with fixed monthly pricing instead of a growing pile of licensing decisions you have to make alone.
Symmnet's managed services cover 24/7 system monitoring, Intune and Defender for Endpoint onboarding, backup and disaster recovery with tested restores, and the compliance documentation that regulated industries need for audits and cyber insurance renewals. Instead of researching every Conditional Access edge case yourself, you get a team that's already deployed this exact checklist across similar-sized companies and knows where the real friction points show up. If your Microsoft 365 tenant still relies on Security Defaults, has more than three Global Admins, or has never had a backup restore tested, start with a free assessment through Symmnet's managed IT services to see exactly where the gaps are and what it takes to close them.
Sources
The console steps and prioritization logic in this checklist draw directly from Microsoft's own documentation, along with practical hardening guidance built specifically for SMB tenants.
- Zero Trust from Microsoft Security
- Security
- Safe Links - Microsoft Defender for Office 365 documentation